
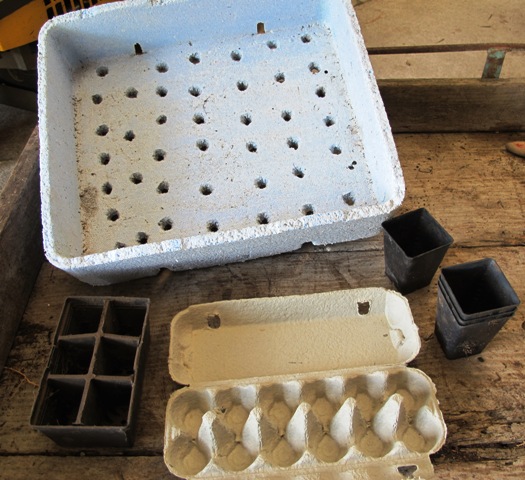
 1) Sowing seed should save you money, especially with vegetables and annuals and it is also the way of getting plants which may not be available otherwise – such as dwarf daffodils, English snowdrops or rhododendron species. We use polystyrene mushroom trays which we have been continuing to use for up to 20 years. Wooden or plastic trays can also be used but you need around 10cm in depth and plenty of drainage holes. Egg cartons can be used for quick turn around crops such as lettuce or peas. You can also reuse the punnets that come from garden centres. Mark likes small individual pots for vegetables.
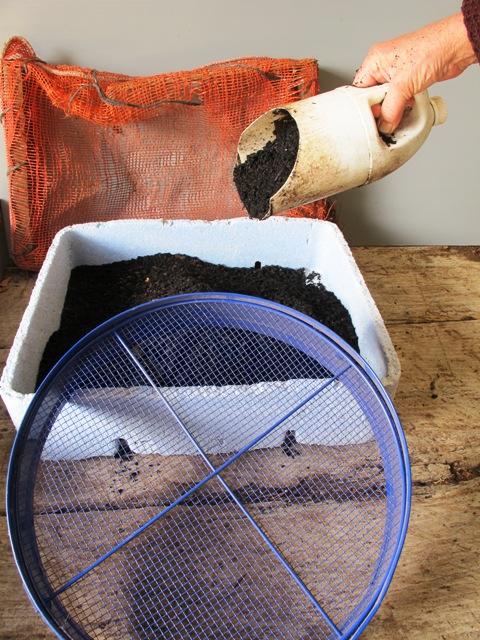 2) It is preferable to use proper seed raising mix which has less fertiliser in it than potting mix because fertiliser can burn young plants. These mixes are sterile, so you know when you see shoots that it is your seeds germinating. You can use garden soil if you want to but coarsely sieve it first to get rid of larger lumps and you need some fine sand or similar to sprinkle over the seeds on top. A home made sieve is fine. You can’t use unwashed beach sand because plants don’t like salt. A bag of seed raising mix is easier and goes a long way so is not expensive.
 3) When filling with mix, tamp it down to get rid of air bubbles by pressing on top of the tray. If you are using egg cartons or individual cells, sharply rap the container on a hard surface to get the mix settling further. However, if you are using garden soil, don’t compact it.
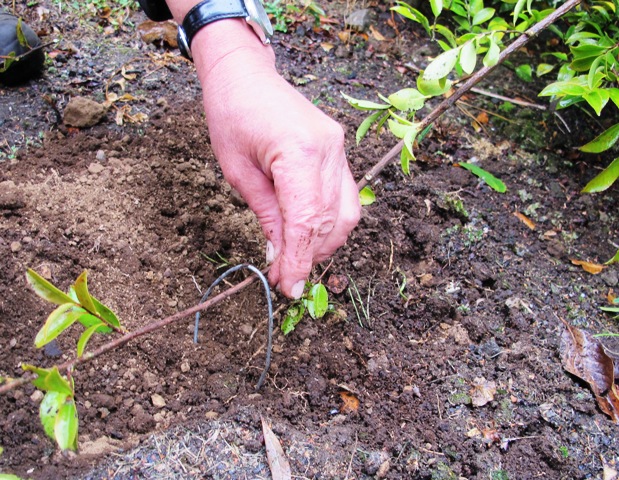
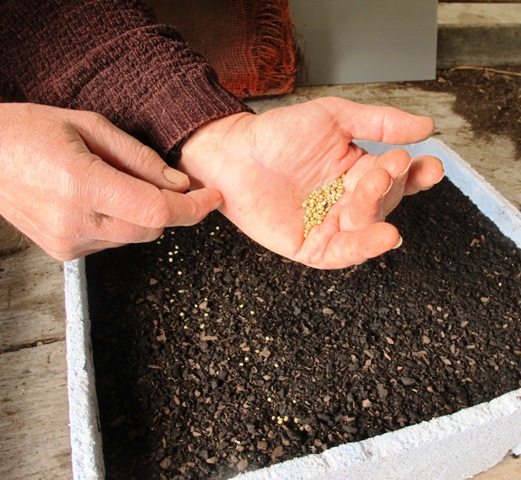 4) Large seed can be hand placed but fine seed is traditionally tapped out of the hand as shown in the photograph or dispersed in small quantities from a piece of folded paper. It can also be dispersed by pinching it between fingers like salt.
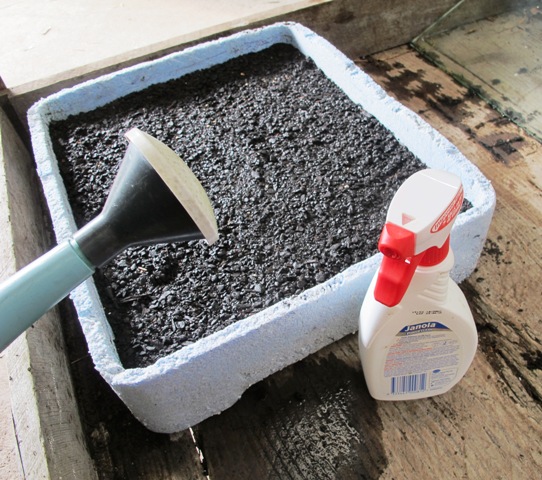 5) Spread a thin layer of mix on top of the seeds. The smaller the seed, the lighter the covering but almost all seeds need a complete cover (primulas and rhododendrons are an exception. These are surface sown – ie not covered). Water carefully. A misting bottle (a well-washed window or shower cleaner bottle with a pump spray) is ideal for fine seed. A watering can with a fine rose to disperse the water is also good. Don’t flood the seeds.
 6) Label the tray. We favour a soft pencil and hard plastic labels which we scrub and reuse for years. Pencil lasts longer than marker pen and is easier to clean for reuse. Precious, fine seed can then be covered with a protective sheet of glass. Stretched plastic can also be used. Until seeds germinate, place the seed trays out of direct sunlight and in good light. It is usually wise to elevate the seed trays away from slugs and snails or cats who think it is a litter box. Check your seed tray daily for moisture levels but do not scratch around looking to see what is happening. When the seeds have germinated, move the tray to sunny conditions and increase the watering as required.
Category Archives: Outdoor classroom
Outdoor Classroom: Layering plants
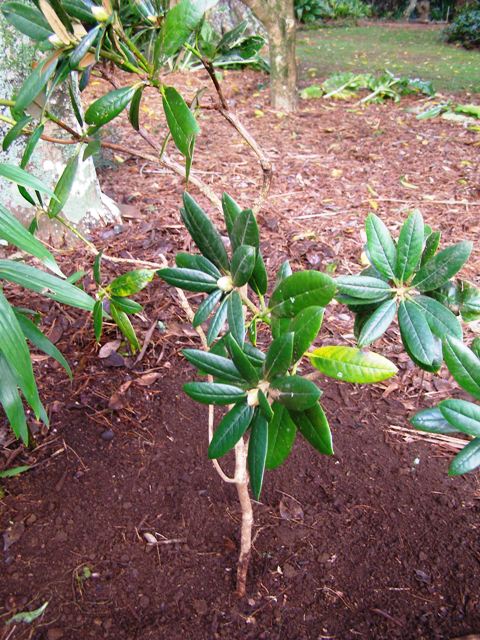
 1) Some plants are difficult to propagate from cuttings, even more so for home gardeners without temperature and moisture controlled conditions. If you are not in a hurry, layering a plant can be a simple way of increasing numbers or of getting a back-up plant for rare or special material which may not be available for sale. This rhododendron has layered naturally where branches lie on the ground.
 2) The plant needs to have low growing, flexible branches which reach to the ground. You may wish to try layering plants such as magnolias, rhododendrons, camellias, daphnes or conifers. Most woody plants can be layered over time but it is faster to do easily propagated plants like hydrangeas from cuttings.
 3) Select a firm branch or stem which can reach to the ground. It does not matter how old the wood is though young growths from last season may root faster. Remove the leaves from the middle if necessary. Slice a thin layer of bark off the lower side (called making a wound). You can paint the wound with rooting hormone if you have it, but this is not critical.
 4) Cultivate a small area of ground beneath the branch or dig a small trench. Peg the branch down so the wound is in contact with the soil. A hoop of wire is ideal for this part of the process. Peg it firmly so it cannot move. Cover the pegged area with up to 10cm of soil. You want to prevent the layered stem from drying out. Leave the branch tip uncovered. Now be patient. It will take a year for easy material and maybe as long as three years for difficult to propagate plants such as many of the rhododendrons.
 5) When the layer has formed a reasonable mass of roots, cut it from the parent plant (think of this as cutting the umbilical cord) and either let it grow a little longer where it is or move it to some well cultivated soil – the vegetable garden is often good – so you can take care of it while it develops into a more sturdy plant.
 6) You will usually need to stake the plant to train it to grow upwards and to start developing a good shape although you can sometimes plant it on an angle to get the main leader almost vertical.
Gardening 101: Dividing perennials
 1) Clumping perennials can get overcrowded and start to deteriorate over time. Some will stop holding their flowers up well, some can die out from the middle while others just look tired and messy. Some need digging and dividing relatively frequently to stay looking their best. This clump of pulmonaria (unromantically known as lungwort) probably started as a single crown two years ago but grows rapidly.
 2) Dig out the clump, shaking off the soil. If you are not sure what you are doing, hosing off the dirt can make it easier to see the structure of the root system which varies between different plants.
 3) Part the leaves to find the separate sections growing from the centre or crown of the plant. Some plants just pull apart. An old carving knife is helpful and a meat cleaver is good for larger clumps with tough crowns. You can use a spade but it is hard to get accurate cuts. The pulmonaria yielded at least 15 divisions, all of which would grow as separate plants if I wanted that many.
 4) Replant the strongest divisions into soil which is well dug and friable. If you are only lifting and dividing every 10 years or longer, this can be a major task as soils compact over time. If you are doing it more often, it is easy as the soil stays looser. Spread the roots evenly and cover to the same level it was earlier. We like to add compost mulch and then water thoroughly but gently. Removing some leaves reduces the stress on the plant.
 5) These three perennials also benefit from lifting and dividing every few years. From left to right: an aster which just pulls apart into separate sections, mondo grass (ophiopogon) which also pulls apart but sometimes needs the runners snipped, and polyanthus which usually needs to be cut through the crown to ensure that each piece has roots attached.
 6) This patch of stachys (lambs’ ears) was dug and divided three weeks ago and has already recovered well because it is in full growth. Timing is not critical in our mild climate but done in midsummer, care needs to be taken to avoid the roots drying out and plants will need thorough watering for the first week.
First published in the Waikato Times and reprinted here with their permission.
“A good soil, like good food, must not be either too fat, or heavy, or cold, or wet, or dry, or greasy, or hard, or gritty, or raw; it ought to be like bread, like gingerbread, like a cake, like leavened dough; it should crumble, but not break into lumps; under the spade it ought to crack, but not to squelch; it must not make slabs, or blocks, or honeycombs, or dumplings; but, when you turn it over with a full spade, it ought to breathe with pleasure and fall into a fine and puffy tilth. That is a tasty and edible soil, cultured and noble, deep and moist, permeable, breathing and soft – in short, a good soil is like good people, and as is well known there is nothing better in this vale of tears.”
Karel Capek, The Gardener’s Year (1929)
Outdoor Classroom – pruning wisteria

Wisterias are vigorous vines which lose all their leaves in winter. You can not plant them and leave them. If you are not going to prune them at least once a year, you may be wiser to take out the whole plant. After several years of less than thorough pruning, this particular plant had multiple runners which had escaped and run along both the base and the top of the block wall for at least fifteen metres. Planted against a house they will split the spouting if left unchecked.

Wisterias flower on old growth so you can’t cut them off at the base and get flowers this season. Look at the plant and decide the shape you want. Check the old stems for borer and rot. Wisterias are vulnerable to the borer larvae. Cut out any bad damage. Choose which stems and canes you wish to keep. You probably don’t need to keep them all.

Take out all thin or surplus canes and growths, starting from the base of the plant. Some wisterias are grafted. If you can see where the graft is, you must cut off any growths below that because they will be from the vigorous root stock which will be a stronger grower. This is a cutting grown plant so it does not apply. Don’t put all your trust in one trunk only. It always pays to train a replacement alongside it. The older and more gnarled the trunk, the more chance of borer and rot taking hold.

Further up the plant, decide your central framework (the shape, or skeleton of the plant) and shorten all minor growths to two to four spurs (leaf buds). This is the same principle to pruning an apple tree. You can use the prunings to weave supports for other plants in the garden because they are flexible and they won’t take root easily.

Look for tell tale borer holes in remaining stems and treat these. Spraying kitchen oil or fly spray down the hole can work.
There are two main groups of wisterias, the Chinese ones (“sinensis” which just means from China) and the Japanese ones (floribunda). The Chinese ones usually have finer leaves and they flower on bare wood before the spring foliage appears. Japanese ones tend to have longer flower racemes to compensate for the fact they flower with their new growth. As a relatively random piece of information, the Chinese ones twine anti clockwise whereas the Japanese ones twine clockwise.

Outdoor Classroom – how to sharpen garden tools

1) Every winter, the advice comes to sharpen and clean tools, but it rarely includes instructions on how sharpening should be done. There is no doubt that good tools with sharp cutting edges make gardening much easier. If you try it, you will believe it. Better quality tools hold a sharp edge longer.

2) It helps to be able to hold larger tools firmly while sharpening and we prefer to do this in a simple workbench vice.

3) Only ever sharpen one side of a spade or push hoe – the side that faces upwards. With a push hoe, this keeps the blade flat to the ground with the cutting angle on the upper side. Spades cut better with one flat side and the upward or outward side bevelled and sharpened. We use a file to sharpen the blade. Home handypeople may go so far as to use an angle grinder but be careful not to overheat the garden tool or you will lose the temper (hardness) of the blade.

4) An oil stone is the best implement we know for sharpening secateurs and can be bought from a hardware store. Most secateurs are held together with a central bolt and nut. You have to unscrew this to take the blades completely apart. Some CRC or oil may help to loosen it. Do not lose the spring in the process.

5) Wetting the stone with oil, use a gentle circular motion to sharpen one side of the blade. Never sharpen both sides of the blade or you will find it no longer cuts (it is the same with scissors). Cutting relies on a sharp bevelled edge meeting a completely flat surface so always sharpen the side of the blade that is already bevelled. Where you have secateurs like these with one blade incurved, this second blade shown on the table will need to sharpened on a round stone or with a round file because it will not sit flat to this type of stone.

6) A quick-fix sharpen for secateurs and scissors can be achieved with this handy little tool from garden retail outlets. It is also the only way we know of sharpening cheap secateurs held together by rivet, or the grape snips with upward curving blades. Run it along the angled edge of the cutting blade about six times. Remember to sharpen only the bevelled side of each blade. This tool is made by Bahco though there are other brands on the market.
