Category Archives: Outdoor classroom

Renovating old camellia plants: step-by-step

1) Camellia sasanqua “Sparkling Burgundy” has had quite a bit of work done on it over the years to thin the branch structure and to lift the lower levels to allow light below. This has made a feature of the size and age of the plant which is now more of a small tree than a shrub.

2) However, this camellia has little in its favour. The top layers of foliage are not in good health and look scruffy and full of dead wood. We will rejuvenate it by cutting it back very hard to bare wood. This is best done any time from through winter until early spring.

3) The plant is virused which affects its vigour. Virus in camellias is not always bad. It is what gives variegated leaves and two tone flowers. However, if you then use the cutting tools on a healthy camellia, you will transfer the virus. It pays to disinfect saws and secateurs immediately after finishing the affected plant. You can do this by simply dipping in a bucket containing diluted bleach.

4) Cut back to whatever level you wish. Most camellias will resprout and come again even when cut off at ground level, but we want a bushy shrub about 1.5 metres high by summer so we are leaving bare woody stems around that height, cut a little lower at the sides than the centre. If you leave some of the old trunks, you keep a strong structure and shape for the bush. If you cut off at the ground, you will be starting over with a carpet of fresh shoots which may not give a good long term shape.

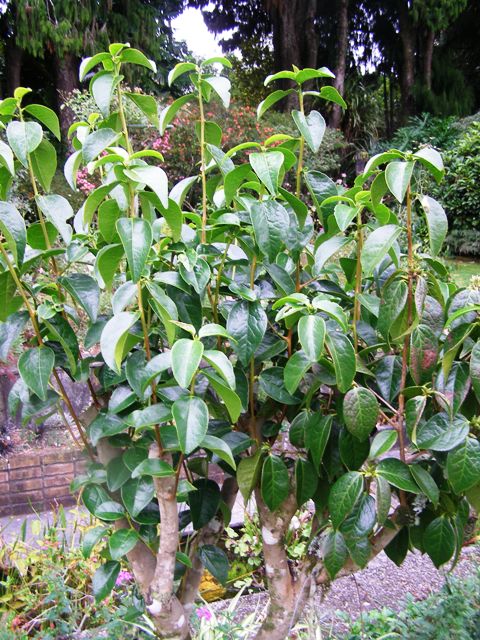
5) This Camellia yuhsienensis was cut back early last spring to completely bare stems with not a single leaf remaining. Such ruthless cutting forced dormant leaf buds into life and it is now a bushy little shrub although we won’t get as many flowers as usual for another year.

Making cold compost step by step (part 3 of 3)

Part one – low tech, low input means of dealing with green waste.
Part two – making a hot compost mix.

1) In an earlier Classroom, we looked at making hot compost where heat helps the breakdown. Cold compost, where the work is done by worms, is by far the most common form of home compost. You don’t need special facilities – a pile on the ground, compost bins or a netting ring are all fine. It needs to sit on dirt so the worms can move in. You are aiming to build up about a cubic metre of composting material at a time.

2) The ingredients and ratios are the same as for hot compost but because cold compost is not usually turned, it is better to build it in layers. Nitrogen comes from green waste (fresh leaves, vegetable scraps, lawn clippings etc) and this can be up to 60% of your mix. Carbon comes from dried leaves and stalky vegetation along with all the twiggy bits and this should comprise 40 to 50% of the mix. The carbon also traps air in the mixture and stops it turning to a sludgy mess.

3) Do not put in seed heads or diseased foliage or plants. Without heat, the seeds and diseases will survive and when you spread your compost, you will be spreading them throughout the garden.

4) The usual advice is that citrus peel and egg shells should not be added but we ignore that because we have large quantities of citrus peel to dispose of. The worms ignore it and it rots down of its own accord. However it pays not to add meat which will attract dogs, cats and rats. If you are adding newspaper, scrunch it up first or it comes out at the end of the process pretty much as it went in. Newspaper counts as carbon content.

5) The compost worms will arrive of their own accord. Striped tiger worms are the most common. If you are worried, you can buy them or transfer them from a worm farm but it is not necessary. If your compost pile gets sludgy and smelly, you do not have enough carbon content and it may have insufficient air (oxygen).

6) When you have about a cubic metre of layered mix, cover the heap or bin. Some people use old woollen carpet. Other options are heavy duty plastic, boards or corrugated iron. We use old weedmat weighed down so it does not blow off. With cold compost, it will take at least six months before it is ready to use and it may take longer over the colder months of the year. But at the end of that, you should have a clean mix which is easy to handle and nutritious in the garden. It is usually best to work with a row of compost heaps, or at least three – one you are building, one that is maturing and one that is being used.

Destroying wasp nests – step-by-step

1) Wasp nests need to be killed off or they can build up to a dangerous size and over-winter. If you see a few wasps, follow them to see where the nest is. These can be in holes in the ground, in dense vegetation, in holes in walls and, on occasion, in your house roof. It is probably best to call the professionals for any inside your house, but garden nests can be dealt to safely and easily.

2) We use a very small quantity of Lorsban (available to approved handlers only) but any powdered insecticide will work. Carbaryl is widely used. The critical detail is that it needs to be in powder form because you are relying on the wasps unwittingly transferring the powder into the nest. Use gloves whenever handling insecticide as a safety precaution.

3) Mark has a measuring spoon wired to a pole about two metres long. You need a steady hand but this means he never has to get near the nest and he has never been stung using this approach. It takes under half a teaspoon to kill most nests, depending on the accuracy of your placement.

4) Morning is the best time. The wasps are a little dozy because they have not yet warmed up and most are out foraging. As they return they will take the powder in. We do not recommend evening or dusk. You are far more vulnerable to attack when they are all in residence. Move lightly and quietly to sprinkle the poison around the entrance, ideally on the inward side. Heavy footed stomping or noise will put the wasps on alert. It only takes a matter of an hour or two to kill the nest out if you get your placement of the insecticide right.

5) If you want to avoid using insecticide, you can kill them with petrol fumes but you have to get closer and the risk of being stung is higher. Partially fill a small bottle with about 200ml of petrol and plug the top of it into the hole so the fumes and liquid flow in and it blocks the exit. The biggest drawback here is that you need to do this on dusk or at night when all the wasps are in residence. It is the fumes that kill them. Do not set fire to it. Move very quietly and lightly. Generally nests have guard wasps which will fly straight at you. For this reason, Mark strongly favours the insecticide in the morning.

Make your own compost hot mix, step-by-step (part two of three)


Compost part one, saw us looking at low tech, low input ways of dealing with green waste. Here we look at how to make hot compost which sterilises the mix.

1) Compost needs five ingredients:
a) nitrogen
b) carbon
c) oxygen
d) water
e) microbes.
You need to actively manage the process with a hot compost mix. The common failing of the black plastic drum as a compost bin is the lack of carbon and the lack of oxygen which means you get a soggy, sludgy mess. Carbon comes from dry, woody material – twigs (cut up small), newspaper (needs to be shredded or scrunched up), wood chips, sawdust (not tanalised), wood ash, dried leaves. As we make a lot of compost, we get much of our carbon content from the mulcher or wood chipper. Carbon content should comprise close to half the total volume of your compost and, as it is often bulkier, it creates air spaces in the mix.

2) The other half, or a little more than half, of your compost ingredients comes from the green waste (which is the nitrogen component). This includes all green leafy waste, animal manure, food scraps and lawn clippings. Compost microbes will come in with the grass clippings, or you can add some of your old compost mix (the old twiggy bits can go through again).

3) We simply pile it all in a heap until we get enough to work with. Wooden compost bins are a tidy option for the small garden. You need three – the first to accumulate the waste, the second to make it in and the third for compost which is ready to use. Make sure that you can remove all the boards from at least one side to make it easy to move the compost through the bin cycle. Each bin needs to be around a cubic metre at the least. A ring of chicken netting is the low tech method of keeping your growing compost pile contained and is probably easier to work with though less tidy.

4) When you have sufficient volume to work with, adding nitrogen in the form of fresh grass clippings, fresh animal manure, urea or blood and bone will give your compost a kick start to generate heat. Mix it all up. When done by hand, the garden fork is the usual tool to mix. We do the mixing with a baby tractor which is admittedly easier but a little excessive for small town gardens. Cover the heap from here on.

5) The heat should reach between 55 and 75 degrees Celsius within a few days. Turn the heap again – sides to middle – to get the whole lot working. You can see the clouds of steam pouring out of our heap which indicates heat. There will be no worms or insect life in hot compost mix. The heat should also kill off weed seeds and undesirable pathogens. Ideally, turn a third time a few weeks later.

6) Cover and leave the compost to cure for a couple of months or longer. The compost will now cool down and it should be light, friable (almost fluffy), clean and have no offensive odour. In our high rainfall climate, we recommend covering with something reasonably waterproof to prevent the goodness from being leached out. We use old weed mat weighted down at the base. You can also use heavy duty black polythene. Boards or corrugated iron are common on a tidy compost bin structure.

Part three – making cold compost mix.

Make your own compost step-by-step guide: part one (of three parts)

1) Trenching is a traditional method. This involves digging a trench down a row of the vegetable garden and burying kitchen scraps and green waste, covering it immediately with soil. It is easy and tidy and the worms and microbes will break it down quickly but it only fertilises a small area at a time. There is no heat generated so weeds and diseased foliage should never be included. Neighbourhood dogs can learn about digging for victory and may excavate your trench if you add desirable food waste.

2)The black bin. We have one in the veg garden for kitchen scraps because our compost heaps are some distance away. It is tidy. The contents rot down and are something of a sludgy mess though this is fine to spread on the surrounding garden. The egg shells, however, remain whole and there can be a problem with spreading disease through potato peelings and brassicas with club root. It keeps dogs and cats out of the scraps but is not rodent proof. Because there is no heat generated, it will not destroy weed seeds or diseases (pathogens). The bin has no base to it which makes it easy to lift and move around. It acts more as a worm farm without provision to gather the worm tea. Our bin is full of tiger worms.

3) If you have many deciduous plants and a build up of too much leaf litter, raking it to a discreet area of the garden in heaps and leaving it for several months can be an easy solution. It needs plenty of rain to break down and the resulting humus will not be as nutritious as compost but it is clean to handle, adds texture to the soil and makes attractive mulch. The leaves piled to the right in the photo are about 30cm higher than the path on the left at this stage but still look tidy.

4) For small town gardens where tidiness is highly prized, the rolling compost drum may be an excellent option. It is not cheap to buy (expect to pay around $220 upwards) but it is very easy to use and as long as you rotate the drum often, it will make good compost faster than any other method we know. If you get your ingredients in the right proportions (more on this next time) and have sufficient moisture and oxygen, the contents should heat up to kill pathogens and seeds and will break down quickly, giving you small quantities of good quality compost in return for minimal effort. Home handypeople can possibly improvise a cheaper alternative.

5) Good compost does not smell, is generally dry and light textured and will leave you with clean hands so it is easy to handle. Sludgy muck, as in Step 2, is rotting organic matter where the breakdown is aided by worms and bacteria in a process which does not generate heat. It still has value but is nowhere near as pleasant to use. Well managed compost can generate enough heat in the process to kill seeds and unwanted fungi and diseases. We will look further at our tried and true techniques of how to generate clean compost in the next Outdoor Classroom.

Part two – making a hot compost mix.
Part three – making cold compost mix.