Category Archives: Outdoor classroom

Outdoor Classroom (for absolute beginners): how to plant a tree

1) If you are planting into grass or paddock, remove the turf from the area first. The rule of thumb is to dig a hole at least twice the width of the root ball of the tree and a little deeper. Break up the clods of dirt thoroughly as you go, because you want friable, well cultivated soil so the tree can get its roots out easily. If water ponds at the bottom of the hole as you dig, look for another site. It will rot the roots. Keep the top soil to one pile and the subsoil and clay to another for when you refill the hole so the subsoil can go back in first.

2) If the plant is in a plastic bag, cut the bag off to avoid damage. Examine the roots. The fine roots are the most important ones. If there are strong roots wound round and round the outside, these need to be cut, because they will stay in a corkscrew shape and not spread out.

3) Often there is a mass of fine roots and the plant is difficult to get out of its pot or bag. Roughen up the outside of the rootball with your hands or make several shallow cuts down the sides. However, do not try and tease all the roots out to spread them. You are far more likely to cause damage than to do any good. As long as you plant into friable soil, the plant will get its roots out on its own. However, if the roots have grown into an envelope shape at the bottom of the planter bag, these can be trimmed off.

4) Getting the plant at the right level in the hole is extremely important. If it is too deep, you risk rotting the stem, too shallow and the roots will be exposed and the plant will dry out too easily. Measure with a stick and backfill the hole with compost and soil to get the level right.

5) Only stake the plant if it is necessary because of strong wind or instability. Trees grow better unstaked because the rocking movement in wind makes them form a strong tapered trunk. Staking can slow this process so never have a stake more than a third of the tree’s height. Put the stake in beside the plant before you refill the hole. Never drive a stake in close to the trunk. You are shearing off an entire section of roots.

6) Where soils are poor or heavy, layering in compost gives better soil texture. However, there is no point in adding extra fertiliser to the hole at this time of the year. Plants take up fertiliser when they are in growth so the time to feed is in spring and summer. Added in winter, it will leach out and disappear with the winter rains, giving no benefit.

7) Once the tree is in place, fill the hole with the original dirt which you have broken up to form a finely textured soil. Firm the plant and gently tread the surrounding soil but do not stomp heavily close to the stem or you risk tearing off the roots. A final layer of mulch will stop weed competition and protect the roots.

8) Where staking is necessary, always use a soft tie such as the stockinette shown here (available from garden centres) or old pantyhose. These do not cut into the bark of the tree. Cross the tie between the stake and the tree to reduce the bark rubbing on the stake. Make sure that the top tie is never more than one third the height of the tree.

Outdoor Classroom – pruning roses

Cymbeline

Cymbeline

One size does not fit all with roses but there are some rules that apply to most rose types. Pruning stimulates growth so in colder areas, it is best left until later in August to avoid new growth getting frosted. In warmer areas, timing does not matter – from now on is fine.


1) Bushy roses with lots of fine, twiggy growth (some standard roses are of this type also) can be given the once over shear with hedge clippers. It doesn’t look the tidiest when the cut ends then die back to the nearest leaf bud, but once they come into leaf there is little visible difference and it is much faster.


2) For more careful pruning, cut out stems with dieback, seen here in the dark brown stems.


3) Cut out stems which show damage or cross and rub against each other, shown here in the two centre stems. The rubbing damages the bark and makes the plant more vulnerable to diseases getting in. Because roses do best with light and air movement, it is usually advisable to keep the middle of the plant open. Remove any spindly, weak stems.


4) Some roses put on very long, whippy growths. Where space allows, arching these growths over and tying them down (I use hoops of wire and a soft tie) forces all the buds along the stem into growth and greatly increases the floral display. Similarly, tying a climbing rose to a horizontal line, encourages that stem to flower all the way along rather than just on top.


5) Shorten the remaining stems back to a leaf bud (if you leave too much past the bud, it will die back to that level anyway) and pick a leaf bud on the outside of the stem. This is because the new shoots will follow that direction and you want them growing away from the plant and not crisscrossing the middle. Angling the cut away from the bud encourages the water to run off. Make sure your secateurs are sharp and cut cleanly, not crushing the stem.


6) All advice is to use a copper spray after pruning to help fight fungal diseases. We have yet to do this (we don’t spray our roses at all) but the advice comes consistently from those who know more about roses. It will also help reduce the build-up of lichens and mosses on the stems and the base. Copper hydroxide is different to copper oxychloride so follow the application rates on the packet and do it at winter strength.

Outdoor Classroom: guide to garden mulches

There are five good reasons to mulch your garden:
a) Mulches suppress weeds when laid to a depth of around 6cm (but the mulch itself needs to be free of weeds).

b) Mulches stop soils from drying out as quickly by slowing evaporation. However they should not be laid on ground which is already dry because they will act as a barrier to stop water soaking in easily when it rains.

c) Some mulches will feed the soil and add valuable carbon content.

d) Mulches protect your soil from wind, torrential rain and erosion and may slow the leaching out of goodness.

e) Most mulches make a garden look much more attractive and reduce dust.

ORGANIC MULCHES

1) Pea straw is popular but when used in areas where peas are not grown commercially, it has a heavy carbon footprint in transporting it. It should be weed free. It adds carbon content to the soil but it is a myth that it fixes nitrogen (peas store the nitrogen in their roots but you are only buying the harvested tops of the plants). It is better in the edible garden, and great for strawberries, but not very aesthetic in the ornamental garden. A bale should cover about 6 sq metres. Water it well or the dry straw may blow away. Oat straw and barley straw are suitable substitutes.

2) Composted bark is widely used and lasts a surprisingly long time. Compounds in the bark stop it rotting down quickly. It adds carbon over time, it should be free of weeds and it is visually discreet in the garden because it is dark brown. Buy pre-composted bark if you can – it does not rob the soil of nitrogen as it breaks down. You can buy small bags but it is cheaper in bulk. A cubic metre should cover about 15 square metres.

3) Leaf litter is readily available and free in autumn. You can either disperse the litter over the garden beds immediately or you can rake it into piles and let it start to decompose first. A leaf rake makes this task much easier than trying to use a garden rake. Leaf litter will enrich the soil but it may look a little untidy in some garden situations.

4) Wood chip, sawdust, and wood shavings are not composted so must be laid on top of the soil and never dug in until they have rotted. This is to avoid them depleting the soil of nitrogen as they break down. Sawdust or shavings must be from untreated timber (tanalised timber is toxic) and fresh sawdust can look garishly orange on the garden. We use the fine wood chip from our mulcher extensively, raking it out immediately to a layer of about 6cm.

5) Old carpet must be natural fibre (generally wool), not synthetic. Test it with a flame – if it melts, it has synthetic fibres. Cutting with a Stanley knife is probably the easiest way to get manageable pieces. It may be best in the vegetable garden because it is not attractive. Lay it with the hessian backing side upwards and you can camouflage with leaf litter. Similarly, newspaper is not an attractive looking option, but it will work if you lay down a thick layer of maybe ten sheets at a time. Coloured pages are fine but avoid any glossy paper. It needs to be weighted down and covered with other garden litter to keep it moist. It represses weeds and adds carbon content.

6) Compost is our preferred option by a country mile but if you are using your own compost, you need to make sure it is as free of weed seeds as possible. Compost adds most of the nutrients the soil needs and is excellent laid as a mulch on top. Let the worms gradually incorporate it into the soil. It looks unobtrusive while nourishing and protecting the soils.

INORGANIC MULCHES

7) Stones are heavy to handle but can be visually effective in the right setting. They also store warmth for plants which prefer hotter conditions. They are best used with permanent plantings where the ground will not need to be cultivated (dug over) as you do not want to have to move the stones. Use a leaf blower to keep the build up of litter removed.

8) Limestone chip can be quite a stark white when first spread but this sometimes suits modern gardens. It is weedfree but it adds nothing to the soil. Once you have laid it on the garden, you will never get rid of it. Acid loving plants like rhododendrons and camellias will turn yellow because the alkaline lime will leach out. The same goes for crushed shell, which is also alkaline. The only way to keep these mulches clean and smart is to use a leaf blower to remove detritus.

9) Fine gravel and scoria are similar options. Fine gravel is a traditional mulch for rockeries and alpine plants because it is free draining and a neutral material. It can look a little industrial or utility in other settings. Scoria will give a decidedly retro 1970s’ look.

10) Weedmat is a commercial product designed predominantly for nursery use. It suppresses weeds and allows rain to penetrate while preventing excess evaporation. It should be laid taut and secured with wire hoops. It has no aesthetic value at all and looks uniformly unattractive when used in home gardens. It is at least better than its precursor, black polythene, which should never be used as a mulch because it sours the soil. Weedmat is bought by the roll and widths vary but it should price out around $1.25 a square metre.

Outdoor Classroom: pruning raspberries, step by step


OLYMPUS DIGITAL CAMERA

1) The timing of pruning raspberries is not critical as long as it happens before they come into growth in early spring. In fact it is widely recommended that you start taking out spent canes as soon as they have finished fruiting in summer (or in autumn for the twice fruiting varieties) but it is far easier when they have lost their leaves and you can see what you are doing. In our experience, it does not matter if we leave it until winter because it does not seem to affect fruiting or plant vigour.


OLYMPUS DIGITAL CAMERA

2) We grow our raspberries in a netted cage which is currently home to the new pigeons who are undergoing six weeks of acclimatisation before release. The pigeons were less than impressed at our intrusion.


OLYMPUS DIGITAL CAMERA3) Strong gloves are recommended, along with sharp secateurs.


OLYMPUS DIGITAL CAMERA4) This season’s new canes which will bear fruit next summer are red. The old canes, which are dying off, are brown and dry. Remove all old canes from the base of the plant. Thin out any weak new canes.


OLYMPUS DIGITAL CAMERA

5) Shorten the new season’s canes to a manageable length around 150 to 180cm. Dig out any suckers which are in the wrong place.

IMG_0031
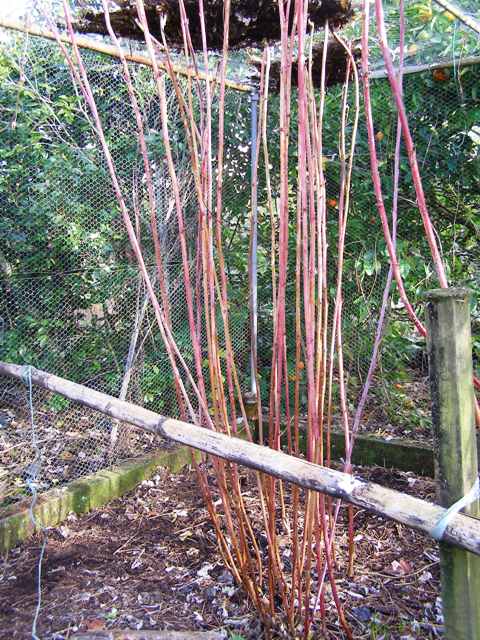
6) Alternatively, hoop the canes over and tie them to a frame as shown here. This is now my preferred approach. While it takes a little more time, it keeps the rampant canes under better control, increases the fruit set down the stem and makes picking very much easier. I then feed each clump with a generous helping of compost.


OLYMPUS DIGITAL CAMERA6) The prunings need to be burned or disposed of. We clip them to manageable lengths and gather them in a wool bale for convenience. You can’t compost prickly old stems. Town dwellers may like to dry them and then burn them on a woodfire or put them out with the rubbish. Ours will go on the burning heap.

Outdoor Classroom: digging out large, clumping plants.

1) Huge, clumping plants which have outgrown their space can be a challenge because it is not always easy to know where to start and they have to be dug out, as opposed to cutting off woody plants. This is an unusual plant called Curculigo recurvata which has grown enormous but many home gardeners may have large clumps of flax or astelia. (The dog is Zephyr.)

2) A reasonably fit and strong person is necessary, armed with a sharp spade. Don’t try it with a blunt spade because it requires a combination of cutting and digging. Sometimes an axe is helpful to cut through big masses of crown. (The suitably strong person is our Lloyd.)

3) Sort out if you have any underground wires or pipes before you start. We didn’t this time. Fortunately the pipe supplying water to our house was alkathene so it was easy to repair.

4) Clear a space around the plant. You need room to move so lift anything precious close by. Starting from the outside perimeter of the clump, take off the sections piece by piece. Don’t try and dig the whole plant at once.

5) Taking it off in sections makes the process manageable. Because this is a relatively rare plant, we will be using some divisions elsewhere in the garden and potting some for sale.

6) We left three small clumps to grow again in the original position. If you are removing the entire plant, the critical part is to get all the foliage and the growth shoots from the base of the clump cut off and removed. It doesn’t usually matter if some of the fibrous roots remain because few plants will grow away again from severed roots. Leaves such as flax or astelia take a very long time to rot down and don’t compost well so we chew them up in the mulcher. You may need to take them for green waste recycling or put them in a discreet place to rot down over the next few years.